Siri Christmas Tree
I started to make our house a little bit smarter a couple of weeks ago. Being an avid iOS user, the way to do it is using the home kit integration. The number of HomeKit-certified accessories is very much limited, at least in Singapore. Luckily, there is a large community of people building solutions to turn any none HomeKit-compliant device into said-so.
Usually, these devices communicate with Zigbee, Bluetooth or just plain old Wifi. Just like the TPlink TP LB100, which is a disable E27 Socket light bulb. It is currently installed into my desk lamp, which has been running for an average of 15.7 hours a day. It comes with a Tplink Kasa app, which can also be used to control other Tplink smart home devices. In general, the app is not bad, lacking iPhone X integration aside, but I want to be able to control the Light with the build in features of iOS and also using Siri.
The tinkerer’s tool of choice is usually a small form-factor device like a Raspberry Pi running an application called HAP-Node. This nodeJS application takes care of imitating a single HomeKit-enabled device in the network, or a bridge device that converts commands into a different protocol to control multiple devices using the aforementioned Zigbee for example.
The Siri-Tree
Just 2 weeks before Christmas, we managed to get a very nice looking artificial Christmas tree. By we, I meant Xiu Fen and the tree is second-hand. But a tree doesn’t really go bad, right? I am not used to artificial trees, but the quality, in terms of look and feel is very close to a real one. It even lost some leafs, as the real ones do. But only while setting it up and bringing into shape.
This was done on Friday night. The lights were repurposed fairy lights from our wedding decoration. They are relatively inexpensive LED lights with a controller module to change between different modes. There are exactly the right amount of LEDs connected in series and parallel, that is is not required to have a dedicated power supply or setup-down module for 230V per in Singapore. We had three sets of lights but ended up only using two. The third one was broken and after my attempt to “fix” it, even beyond repair. I shorted some writes in the control unit and it blew up. This was somehow a blessing because I could take apart the beginning and end of the lights and use them to build a relay in the middle. The fairy lights can be daisy-chained.
Smart Tree
I cut off the front and back end of the broke lights and soldered one end together, with some heat shrink of course, and the other two ends went into a 5V relay. This now offers the ease of use to plug any 230V appliance into the socket and the socket into the wall what I want and control it via the relay. Unfortunately, the plug and the socket are of Type C (Europlug) which is not the most used plug in Singapore, but with some “force” it also fits into the Type G (UK Plug) sockets.
Coming back to the relay. This 5V relay needs 5 V on is input in order to change its state. A for most relays the output side, where the high(er) voltage is connected has two modes. Normally open (NO) and normally closed (NC), meaning should the circuit be open when there is no power on the control side or close. Since I didn’t really trust the entire cabling, I opted for NO.
As a tool of choice for controlling the relay, I went with a raspberry pi 2 with a wifi dongle. I had gotten this one back from a friend who didn’t need it anymore. The raspberry pi 3 is currently in use in my photo booth (project description coming). A Pi one or Zero W can do the job as well.
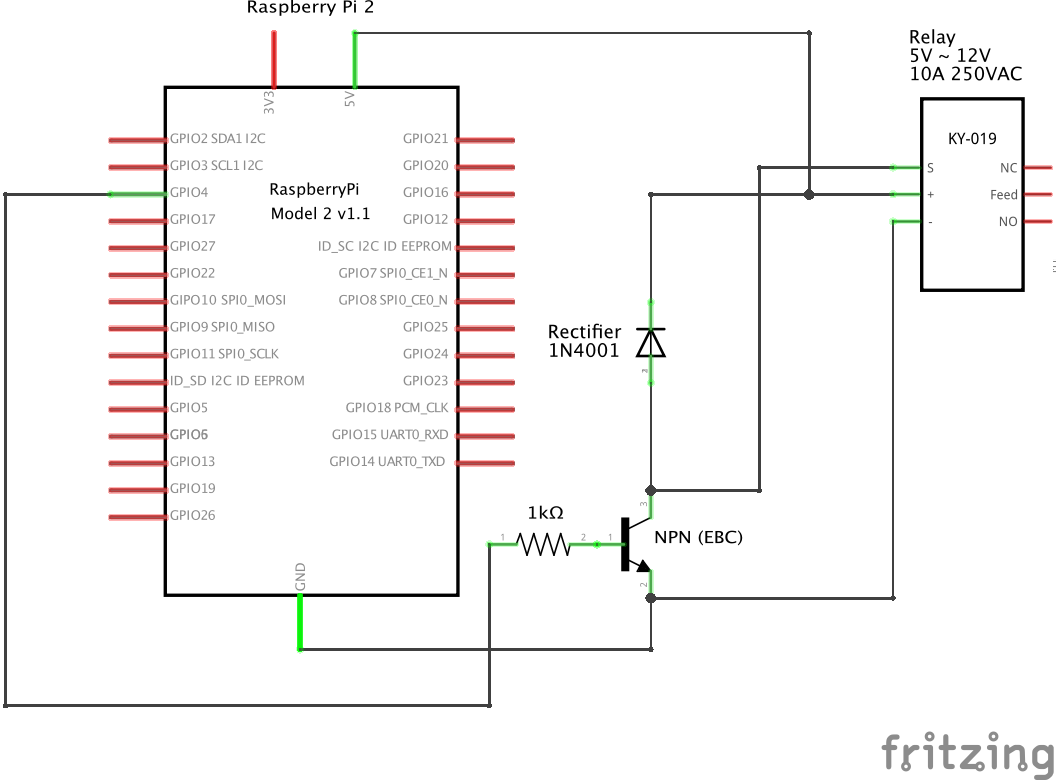
The circuit was fairly simple, as it can be seen below. The parts include a 1k Ohm resistor, 1 NPN transistor, 1 Rectifier Diode and a couple of connecting wires. After the initial setup on a breakout board and the functionality testing, I had to pull out my soldering iron on more time and put it all together. The connecting wires for the final assembly were salvaged from the broken fairy lights.
The Smartness
The Siri compatibility comes from the aforementioned NAP-Node package. There I simply used the light accessory module and filled in a couple lines of ES6 (javascript) code to set GPIO pin 4 to high when I want to turn the tree off and set it to low when I want to turn it on.
The last step is to run the HAP Core and make it restart automatically when it fails. This can be done using several tools in the NodeJS ecosystem. For this one, I chose Forever since I used it in other projects before.
After all the code was running on the Raspberry pi, I turned to my iOS device to see if it shows up in the Homekit app — and It did!
The manual pairing takes a little longer than I would have liked but afterwards, I could turn the tree on and off using all my iOS devices. Since I named the light accessory “Christmas tree” I could even use Siri to turn it control it.

