After coming back from a three-week long to Europe and north america, I found that one of my hard drives has died and the data ist very much lost. This was very sad, but not 100% fatal, since the drive was more or less a mess for large temporary files and my media collection. The incident nonetheless made me realise that I have a couple more drives around my computer that have more valuable content but are roughly the same age and manufacturer — SEAGATE. In my last 10 - 15 year of I have lost 3 Seagate drives due to some problems and not a single one from Wester Digital. I always gave them the benefit of the doubt and tried it again after a couple of years. But now it is over.
I was debating with myself on how to secure my data better. Online backups are one solution but should only be a second tier. Luckily, 1Gb/s internet upload speed make It actually feasible at least to some providers like google or amazon. Unfortunately, Dropbox does not offer great upload speeds in Singapore.
A local network storage with redundancy is a great solution that could also serve as a media server as well as Time-Machine backup solution for my Mac Computers. Boxes from Synology or Drobo area great devices and i have heard good things about them. For me, the Synology product portfolio is just confusing and I was always under the impression to by the wrong device. Drobo on the other hand was just expensive.
I was reading up on the freeNAS operating system that uses ZFS and the built in features like snapshots and software raid to protect me against data loss. I decided to go with that, which allowed me to build the machine with the specs I wanted, get the price down a little bit and also build a PC from scratch.
Research and Constraints
There are a couple nice blog posts about building a FreeNAS machine. He updates this post every year. This was my starting point. I also watched some youtube videos on this subject.
When building a NAS machine, I wanted to have some features like (1) a small case that doesn’t use a lot of space and isn’t particularly ugly to look at since it will be located in the living room where the Router is located, (2) it should house many 3.5 inch drives, my goal was 6 but with the increasing disk space I might not need that many and (3) the motherboard need to have a suitable number of SATA-3 ports to connect the drives
I wanted to follow one of the guides in respect of going with a server grade board and ECC memory ( apparently recommended by “everyone”). It would have been great to go with a Fanless design, but since I live in a country where the temperatures never drop below 23°C, I decided to go with a proper CPU and Fan combination. The sever grade board I was trying to get was the AsRock E3C226D2I, since it supports up to 6 SATA-3 connections and a current LGA 1150 Socket as well as ECC support. For ECC to work, the motherboard, the CPU and the RAM have to support that feature. Most modern Intel CPUs do, and buying ECC RAM is not much more expensive than non-ECC RAM, but consumer grade motherboards usually don’t support it.
Since it was nearly impossible to get the Motherboard I wanted here in Singapore and shipping it from the USA would have been way more expensive, I decided to not go with the ECC option and build a system with consumer grade motherboard.
I went with the following parts:
1 Fractal 304
2 Intel Core i3 6300
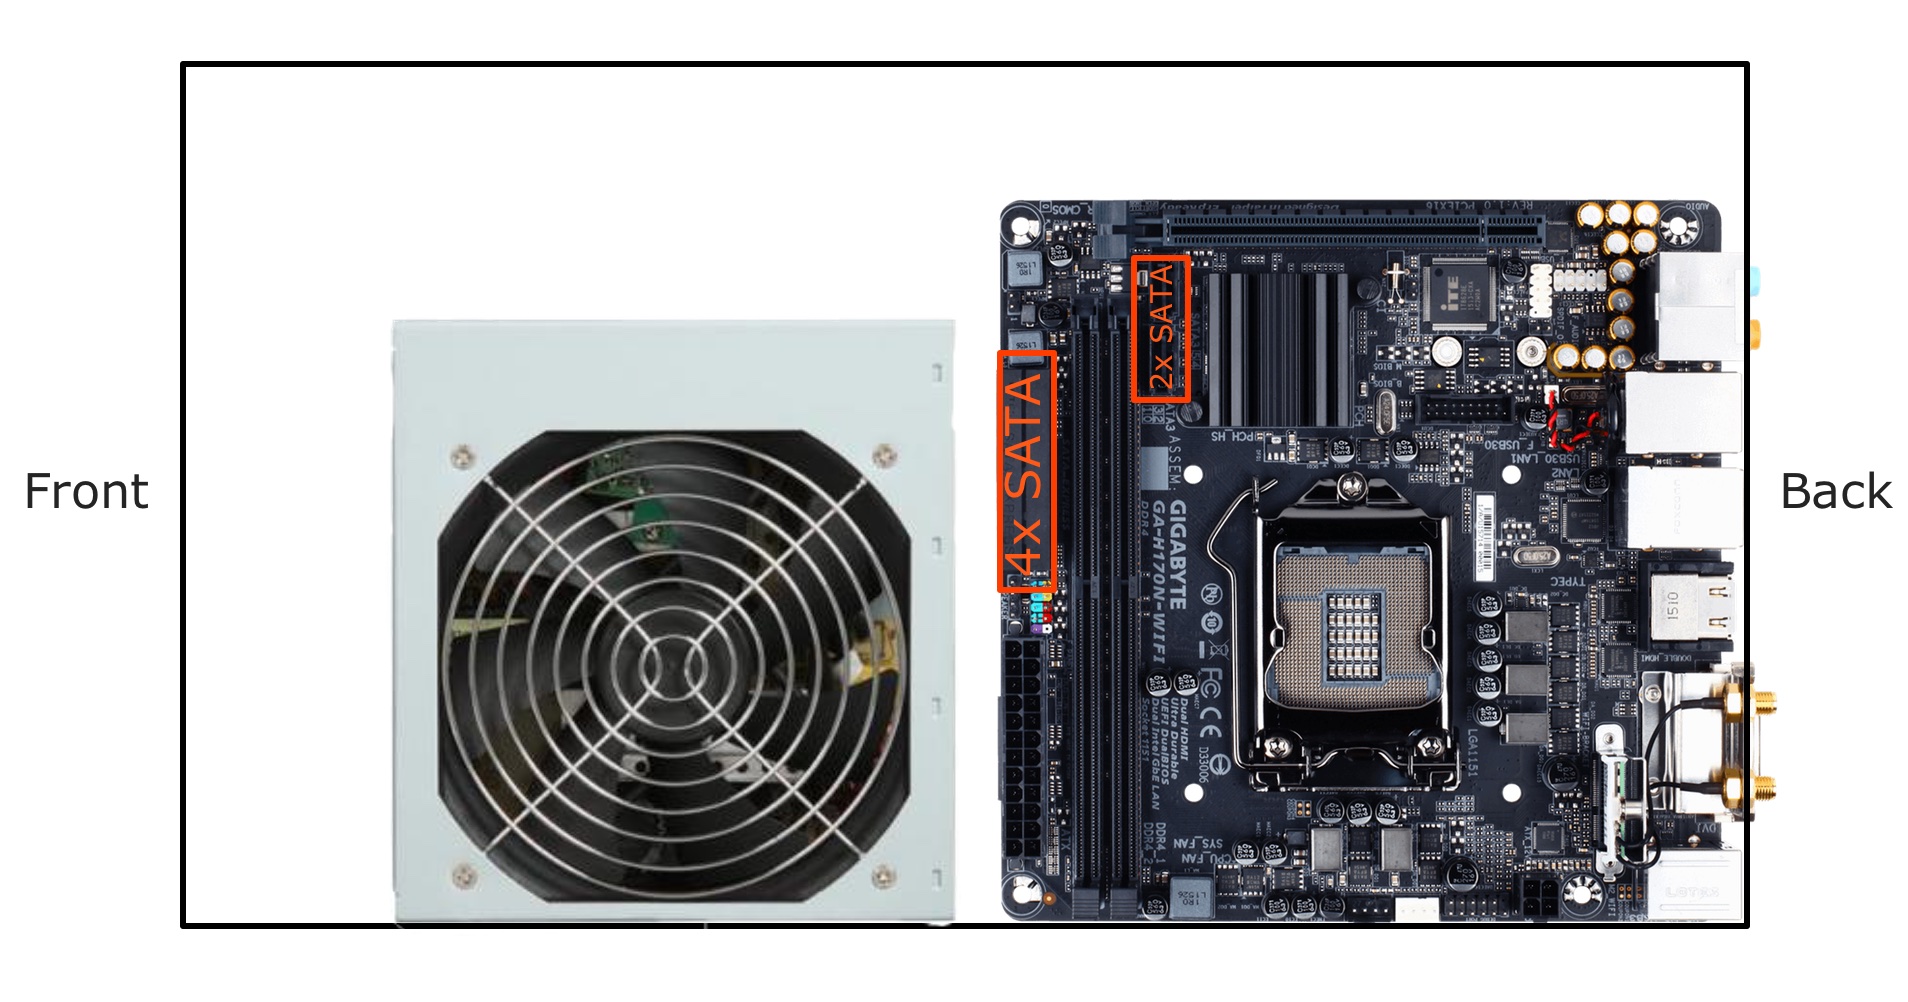
3 The GigaByte GA H170N-Wifi Motherboard
4 3x 4TB WD Red Hard drives
5 16 GB of Crucial DDR 4 RAM
6 An Elite Power Supply with 450W
7 a 128 GB SSD for running the Operating System from
The Gigabyte motherboard is a nice choice since it has the 6 SATA-3 ports, build in Wifi, and additionally a M2 slot for SSDs. Additionally, the board is a mini-ITX boards and can use the latest generation of Core processors from intel. My idea was to use a small SSD to run the operating system from and use is as cache as well. Many people say that the operating system can also be run from a USB 3 Thumb drive, but I didn’t want to do that since the board had an SSD slot. I went for 3 4 TB drives which give me 12TB of storage, which reduces to roughly 8TB when having 1 drive redundancy.
I bought all the parts on a Friday night at Sim Lim Mall here in Singapore and paid a total of S1500 which converts to about 1000€ or 1100 USD. This would have been a little cheaper in the USA or Europe due to really high prices on the HDDs in Singapore, which made up about 50 % of the price.
Building
The entire building process was recorded and here is the video.
When assembly was rather easy and even though I hadn’t build a computer in like 6 years, I was still able to do it rather quickly with the help of my flat mate. I was surprised to see that the CPUs don’t have actual pins anymore, but rather have contact points that connect to the socket.
Difficulties
After installing the motherboard, the CPU, the PSU and all drives it was time to wire everything up. There the problem started. Due to the fact, that the PSU is right behind the motherboard and that 4 of the 6 SATA connectors are mounted sideways, we had problems installing the SATA cables.
After removing the PSU and installing the cables , which now have to bend in a very scary way the build was complete.
All Fans were spinning properly the HDDs also spun up and didn’t make any strange noises. Now it was time to finish the cabling and closing the case.
After connecting it to a screen, I checked the BIOS whether all drives were correctly detected by the system and I found out that one wasn’t. I had to open it up again and figure out which one it was and hoped that is wasn’t one that was connected to any of the sideways SATA connectors and I damage a cable. Unfortunately, It was one of the connectors on the side. I had to once again remove the casing and the PSU to check it it was the connector or the cable. The cable was fine, since on a different connector the drive was detected just fine. I later found out, that when you install a SSD in the M2 slot of the board, one SATA connector will be lost. This now leaves me with 5 usable SATA connector. My idea of using the SSD as cache and OS installation disk also turned out to be a wrong thinking on my side, but since the SSD it mounted underneath the motherboard, removing it now includes taking apart the entire Computer.
Afterthoughts
I am very happy with the build and the speed is great. I can transfer files with gigabit speeds with no problem. I am also using the snapshot feature of the ZFS system to protect myself from accidentally deleting important files. I installed a media server and a couple of other applications on the machine as well and It is handling everything without any problems.
If I had to build It again, I would most likely go with an even smaller CPU and PSU.
I hope that once a drive dies, I the redundancy will help to rebuild the drive and no data will be lost. I am still doing backups to my older drives, just in case.